This Month’s Household Hint
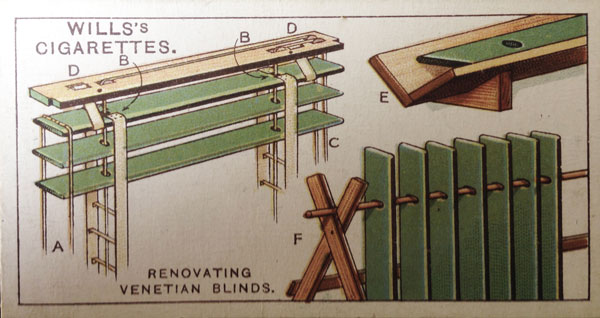
RENOVATING VENETIAN BLINDS
Remove tacks from bottom lath, and cut off knots in cord; pull out cord c and take out laths. Unscrew top fastener lath from window frame and attach reversing cord a and ladder tapes b b from the second lath. Sling tapes d d should be removed for cleaning or renewing if worn. Laths should be washed with warm soapy water, and, if necessary, repainted. A cradle e made of two batons and longer than the laths will be found most useful when repainting. F shows a neat method of hanging laths to dry.
‘Their honest charm and make-do-and-mend philosophy is a breath of fresh air in today’s throw-away world’
Make do and mend
During the 1930s W D & H O Wills, manufacturers of cigarettes, brought out series after series of advertising cards, each centered around a theme. One of the series was included in each packet of cigarettes sold.
A collection could be built, such as of film stars, famous cricketers, footballers, castles & abbeys, wildflowers or heraldry, and then displayed in a Wills cigarette card album. These cards were collected by many, and are still treasured by vintage collectors today.
The 50 Household Hints range illustrated very simply how to do many handy things, such as make a wireless earth, clean a thermos with egg shells and vinegar, restore an oil painting, secure a loose knife-handle, repair linoleum, rid moths from the carpet, to how-to-make a dog kennel.
Their honest charm and make-do-and-mend philosophy is a breath of fresh air in today’s throw-away world, and the illustrations are perfect. A G Hendy & Co will be sharing the timeless Household Hints series on this page over the coming months.
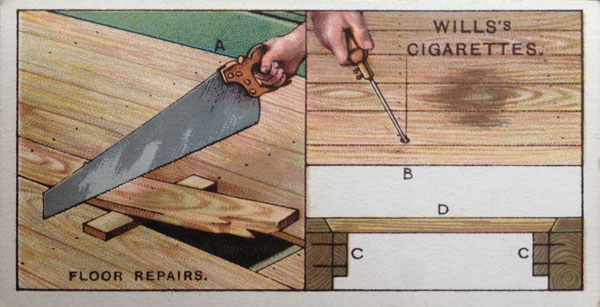
FLOOR REPAIRS
When the end of damaged board can be seen, brads on either side nearest damaged part must be punched into joists. Lift and support board by block and wood A, and cut through above joist. If neither end of board can be found two cuts must be made, so as just to clear joists on each side of defective part. Bore the plank obliquely with brace and bit or large gimlet, and finish oblique cuts with short keyhole saw B. two fillets CC screwed to joists serve to support new section D. It is sometimes possible to raise boards sufficiently to permit sawing through immediately over joists, thus rendering supporting fillets unnecessary.
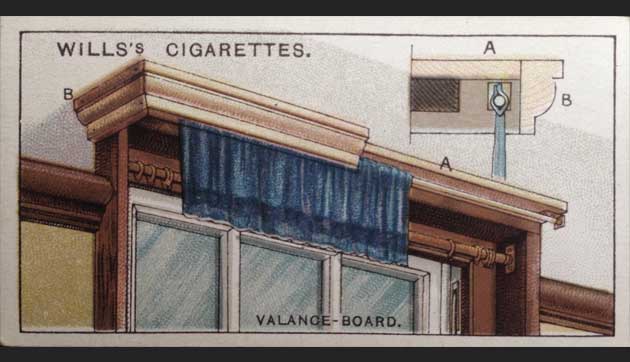
VALANCE BOARD
A valance board of the type illustrated makes a neat finish to a window, and affords a satisfactory method of hanging the valance and outer curtains. The board A should be 3” wide. ½” thick and as long as the extreme width of the window frame, or longer, if it is desired to increase the apparent width of the window. This board should be nailed to the top moulding of frame. For the moulding B, deep picture rail or architrave moulding may be used. The corners should be mitred, and the return pieces nailed either to the window moulding or to small blocks fixed to the wall.
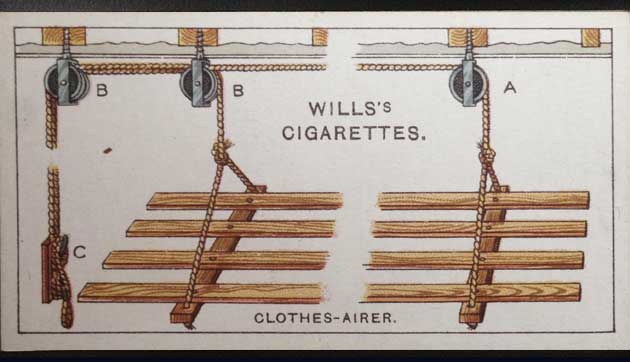
CLOTHES-AIRER
Most housewives find a ceiling clothes-airer useful in the kitchen or scullery, for it economises space, is out of the way when not in use, and allows clothes to have the benefit of hot air, which always rises. the rack may be 3 feet by 5 feet long, according to size of room and capacity desired. The single pulley A, and the double pulleys B B, must be firmly screwed into the ceiling joists in order to carry the hoisting cords which are secured to a cleat hook C. the position of joists may be ascertained by lifting a floorboard in the room above.
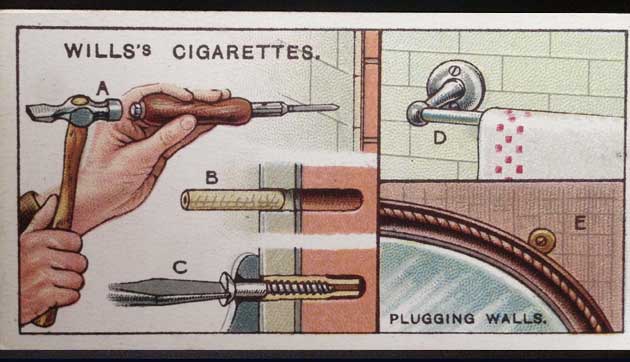
PLUGGING WALLS
When putting up brackets, coat-hooks, shelves and such fixtures as D and E, house-holders frequently need to plug their walls. The old-fashioned wood plug was at its best rather clumsy, and took a long time to fix. The well-known proprietary brand of wall plug is neater, quicker and very much stronger. The hole is made with a special bit of hardened and tempered steel rotated between fingers and thumb and tapped lightly with a hammer, A. when the hole is deep enough, insert a plug about the length of the screw-thread, but not shorter, B. the screw may then be placed in the hole in the plug and screwed home, C.
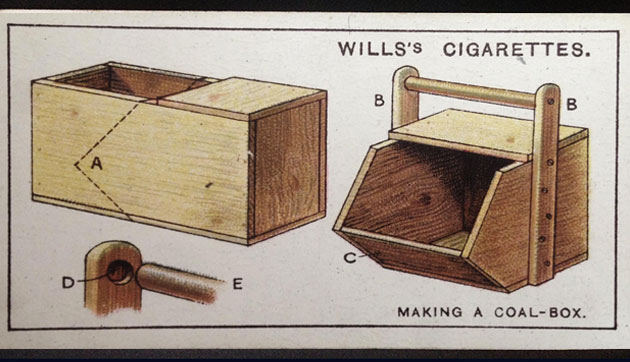
MAKING A COAL-BOX
Our picture shows a neat and strong coal-box constructed quite easily from a stout box or packing-case of suitable shape. Part of the lid is nailed down, and the sides sawn through as shown by the dotted lines A. The piece C is then cut from the waste wood of box, and nailed into position. In the two strips BB (of 5/8 or 3/8” wood) circular holes D are drilled ¼” deep, and big enough to fit the ends of the round handle E. A piece of old broom handle ½” longer than the width of the box, would serve this purpose.
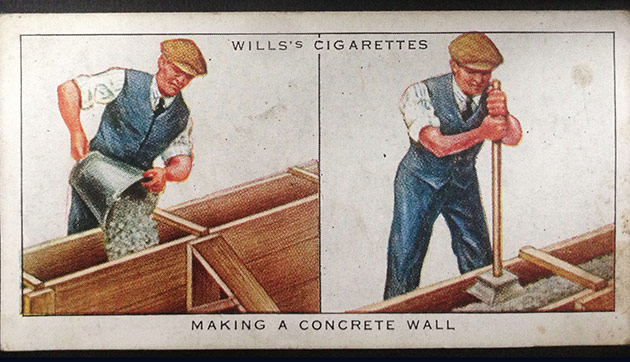
Making a Concrete Wall
DIG A SHALLOW TRENCH ALONG THE SITE TO SERVE AS FOUNDATION, AND BESIDE IT ERECT TWO SHUTTERINGS HELD TOGETHER BY CROSS-BATTENS AND SUPPORTED BY STRUTS, AS SHOWN ON THE LEFT. THE DISTANCE APART WILL, OF COURSE, DETERMINE THE THICKNESS OF THE WALL. FILL WITH WELL-MIXED CEMENT. A SUITABLE MIXTURE IS TWO PARTS SAND, 3 PARTS CHIPPINGS AND 1 PART CEMENT. RAM DOWN SOLID, AS SHOWN ON RIGHT. IF A LONG WALL IS TO BE BUILT, IT MAY BE CONSTRUCTED IN SECTIONS, THE SHUTTERING BEING TAKEN DOWN WHEN ONE SECTION HAS SET, AND RE-ERECETD WHERE REQUIRED.
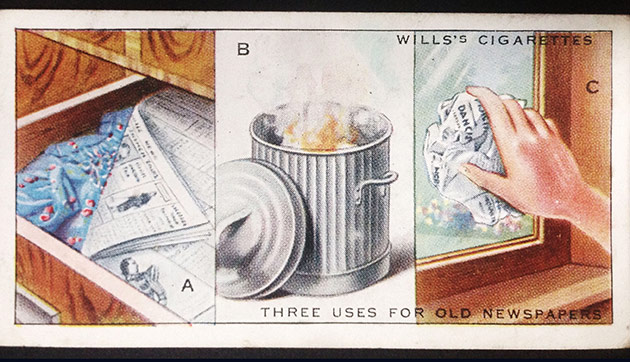
Three Uses For Old Newspapers
REGULAR BRUSHING OR VACUUM CLEANING SHOULD AS A RULE KEEP A CARPET CLEAN OF MOTHS. IF, HOWEVER, A CARPET HAS BECOME INFESTED, THE FOLLOWING METHOD OF TREATMENT SHOULD DESTROY ALL MOTHS’ EGGS IN THE MATERIAL, AND THUS PREVENT FUTURE DAMAGE. DISSOLVE A QUARTER POUND OF ROCK AMMONIA IN A PAIL CONTAINING ABOUT A HALF-GALLON OF BOILING WATER. IMMERSE THE CENTRE OF A LARGE HOUSECLOTH IN THE LIQUID, KEEPING THE EDGES DRY BY HANGING THEM OVER THE SIDES, AS SHOWN. WRING THE CLOTH BY THE DRY ENDS, LAY FLAT ON THE CARPET, AND IRON WITH A VERY HOT IRON UNTIL DRY. GO OVER THE ENTIRE CARPET IN THIS MANNER.
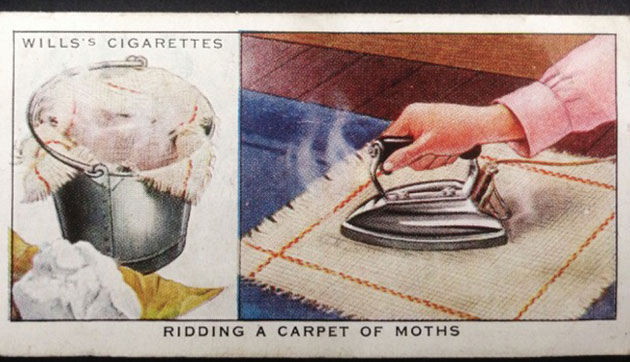
Ridding a Carpet of Moths
REGULAR BRUSHING OR VACUUM CLEANING SHOULD AS A RULE KEEP A CARPET CLEAN OF MOTHS. IF, HOWEVER, A CARPET HAS BECOME INFESTED, THE FOLLOWING METHOD OF TREATMENT SHOULD DESTROY ALL MOTHS’ EGGS IN THE MATERIAL, AND THUS PREVENT FUTURE DAMAGE. DISSOLVE A QUARTER POUND OF ROCK AMMONIA IN A PAIL CONTAINING ABOUT A HALF-GALLON OF BOILING WATER. IMMERSE THE CENTRE OF A LARGE HOUSECLOTH IN THE LIQUID, KEEPING THE EDGES DRY BY HANGING THEM OVER THE SIDES, AS SHOWN. WRING THE CLOTH BY THE DRY ENDS, LAY FLAT ON THE CARPET, AND IRON WITH A VERY HOT IRON UNTIL DRY. GO OVER THE ENTIRE CARPET IN THIS MANNER.
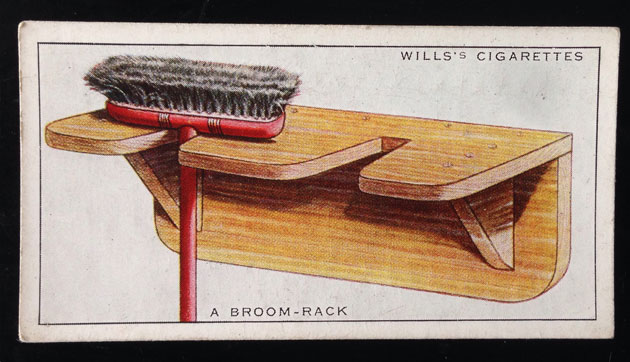
A Broom Rack
BROOMS KEPT IN A RACK ARE NEVER IN THE WAY AND RUN NO RISK OF THEIR BRISTLES GETTING CRUSHED. TO MAKE THE RACK, OBTAIN A WELL-PLANED PIECE OF DEAL, ABOUT ONE INCH THICK. SAW OFF TWO EQUAL LENGTHS, ACCORDING TO SIZE OF RACK REQUIRED (TWENTY TO TWENTY-FOUR INCHES IS A SUITABLE LENGTH FOR A TWO-BROOM RACK), AND IN ONE, CUT OPENINGS, AS SHOWN IN OUR ILLUSTRATION. THE SECOND PIECE IS USED AS THE BACK. ROUND OFF THE CORNERS, PROVIDE TWO TRAINGULAR PIECES FOR SUPPORTS, AND SCREW THE WHOLE FIRMLY TOGETHER.
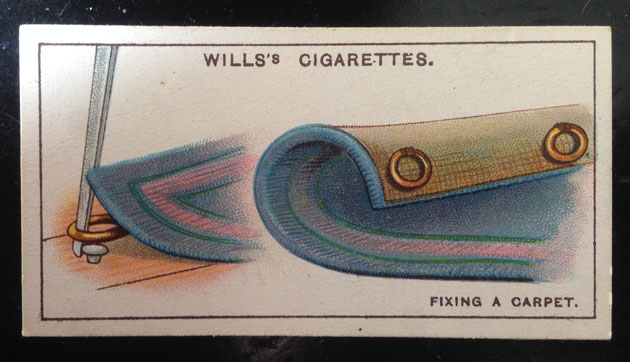
Fixing a Carpet
THIS SHOWS A USEFUL METHOD OF FIXING A CARPET SO THAT IT MAY EASILY BE TAKEN UP. IT IS PARTICULARLY SUITABLE FOR CARPETS WHICH FIT CLOSE UP TO THE WALLS. THE RINGS, WHICH ARE ABOUT 6 TO 8 INCHES PART, FIT OVER 1 INCH CLOUT NAILS DRIVEN IN THE FLOOR TO CORRESPOND. THEY MAY BE LEVERED OVER BY MEANS OF A GOUGE BIT OR SCREW-DRIVER, AND THE CARPET STRETECHED INTO PLACE. LEATHER TABS ARE SOMETIMES PREFERRED TO RINGS AS BEING LESS LIABLE TO WEAR THE CARPET. IT IS, HOWEVER, INADVISABLE TO ATTACH AT A PLACE WHERE THIS IS MUCH TREAD.
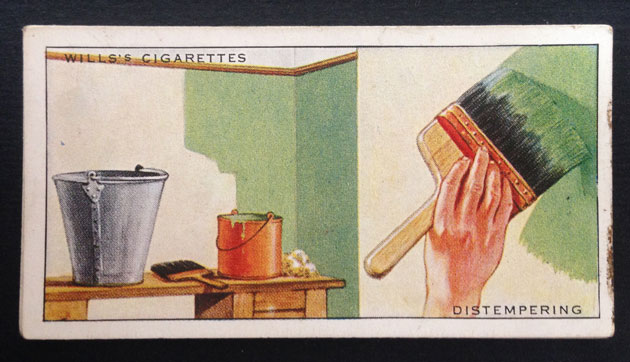
Distempering
WASH THE SURFACE TO BE DISTEMPERED WITH A LARGE BRUSH DIPPED VERY FREQUENTLY IN A LARGE PAIL OF WATER, SCRAPE SMOOTH, AND FILL ALL THE CRACKS WITH PLASTER OF PARIS OR PLASTERER’S PUTTY. APPLY THE DISTEMPER FAIRLY THICKLY WITH A SMOOTH, UNIFORM ACTION. THE BEST METHOD IS TO WORK IN STRIPS TOWARD THE LIGHT, ENSURING THAT EACH STRIP IS APPLIED BEFORE ONE EDGE OF THE RPEVIOUS ONE IS DRY. DISTEMPER SPLASHED ON PAINTWORK AND FLOOR SHOULD BE SPONGED OFF AT ONCE. CLOSE ALL DOORS AND WINDOWS IN THE ROOM WHILE DISTEMPERING, OTHERWISE THE WORK MAY DRY IN PATCHES. IMMEDIATELY ON COMPLETION, THEY SHOULD BE OPENED AGAIN TO ENSURE RAPID AND UNIFORM DRYING.

Restoring a Crushed Broom
BROOMS SHOULD NEVER BE STOOD ON THE BRISTLES, AS IN TIME THIS WILL RESULT IN THE BRISTLES GETTING CRUSHED. IF THIS HAS HAPPENED, THEY MAY BE RESTORED IN THE FOLLOWING MANNER. HALF FILL A KETTLE WITH WATER AND BRING TO THE BOIL. WHEN THE STEAM IS POURING STEADILY FROM THE SPOUT, HOLD THE CRUSHED BRISTLES TO IT. RUB THE HAND SMARTLY OVER THE BRUSH, TAKING CARE, HOWEVER, NOT TO LET IT APPROACH TOO NEAR THE SCALDING STEAM. THIS TREATMENT WILL RESTORE BOTH BRISTLE AND FIBRE BRUSHES.